Level 4: Full Node
Save Bitcoin and run your own node (as much as you'd be comfortable hiding under your mattress).
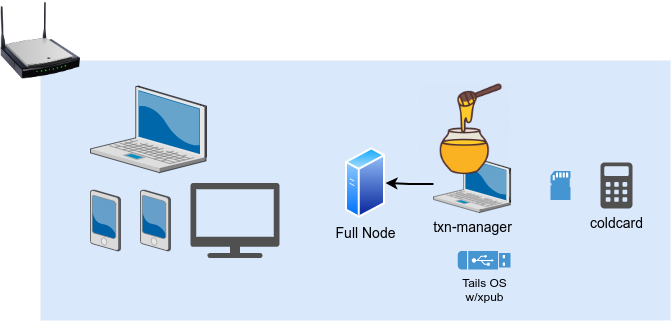
Running a Bitcoin full node enhances your self-custody by allowing your transaction manager to verify transactions and balances against your own copy of the Bitcoin blockchain. This eliminates reliance on third-party nodes, boosting privacy and security. In Level 4, you’ll integrate a full node into the setup from Level 3, using it to support your transaction manager while keeping private keys offline on a dedicated signing device like a Coldcard.
No paid nor influenced content -- all views are from personal experience
Why Run a Full Node?
A full node downloads and validates the entire Bitcoin blockchain, ensuring you trust only your own verification of the network’s rules. Benefits include:
- Privacy: Your transaction manager queries your own node, reducing risks of IP tracking or data leaks.
- Security: You verify transactions and balances yourself, avoiding reliance on potentially malicious external nodes.
- Sovereignty: Running a node strengthens Bitcoin’s decentralization, contributing to network resilience (effectively +1 more copy of the blockchain).
We'll use Bitcoin Knots, a Bitcoin full node implementation with enhanced privacy features and spam filtering compared to Bitcoin Core. Knots includes tools like improved transaction filtering and mempool policies to reduce spam, making it ideal for privacy-focused self-custody.
Setting Up Your Full Node
For simplified node management, consider Umbrel or Raspiblitz or MyNode, which provide web interfaces and tools like Electrum Server. However, these may default to Bitcoin Core; you’ll need to manually install Bitcoin Knots (check project documentation for compatibility).
To run a Bitcoin Knots full node, you need a dedicated device with sufficient storage (2TB recommended). A Raspberry Pi 4 or 5 with an external SSD is cost-effective, though a dedicated Linux laptop or desktop (e.g., Ubuntu) offers better performance.
DIY Node Setup
- Install Linux
- Install Bitcoin Knots
- Visit bitcoinknots.org and download the latest Bitcoin Knots version for your system.
- Verify the download using GPG signatures to ensure authenticity.
- Configure Bitcoin Knots
- Create a
bitcoin.conffile in the Bitcoin data directory (~/.bitcoin/on Linux). - Add the following settings for a secure, node-only setup:
server=1 rpcuser=yourusername rpcpassword=yourstrongpassword txindex=1 listen=1 bind=127.0.0.1 prune=0 blockfilterindex=1 dbcache=4096 txindex=1enables transaction indexing for wallet queries;prune=0ensures a full archival node;blockfilterindex=1supports advanced privacy features.
- Create a
- Start Bitcoin Knots
- Run
bitcoind -daemonto start the node in the background. - The initial sync may take days, depending on hardware, internet speed, and
dbcachesettings. Monitor progress withbitcoin-cli getblockchaininfo.
- Run
- Secure Your Node
- Configure your firewall to allow only tcp/8333 (Bitcoin P2P) for external connections and restrict RPC access to localhost (or to your local network).
- Enable Tor or a VPN for additional privacy if your node is externally accessible.
Speeding Up Initial Sync
Setting dbcache to a higher value (e.g., dbcache=12288, 12 GB) significantly reduces the time for Initial Block Download (IBD) and verification by caching the UTXO set in memory. Ensure your system has enough free memory to avoid swapping, which could slow down the process. For example, a Raspberry Pi with 8 GB RAM can safely use dbcache=4096, but if you have plenty of memory (16+ GB) it is best to keep the entire chainstate (UTXO set) in memory.
Integrating with the Transaction Manager
With your Bitcoin Knots node synced, configure your Level 3 transaction manager to connect to your node (and Electrum Server, if available). This assumes you’re using Tails OS with Electrum or Sparrow for your watch-only wallet.
- Set Up Electrum Server (recommended for efficiency):
- Install Electrs on your node to provide additional indexing for faster performance.
- Configure Electrum on Tails OS:
- Boot Tails OS and open Electrum.
- Go to
Preferences > Networkand selectConnect to a specific server. - Enter your node’s IP address and port (e.g.,
192.168.1.100:50002for Electrs).
- Verify Connection:
- Confirm Electrum connects to your node and shows synced status.
- Ensure your watch-only wallet loads addresses and balances correctly.
Signing Transactions
The signing process remains identical to Level 3, however, when you verify transactions and broadcast, you will retain privacy so long as your transaction manager is communicating with your full node.
- Create an unsigned transaction on your transaction manager (Tail OS).
- Transfer the transaction file to your offline signing device.
- Sign the transaction.
- Return to the transaction manager, load the signed transaction, and broadcast it via your Bitcoin Knots node.
Disclaimer: Running a full node requires technical effort and responsibility. Verify software downloads, secure your hardware, and double-check transactions. Self-custody and node operation carry risks, and you are responsible for protecting your Bitcoin.