Level 3: Dedicated Hardware
Save Bitcoin using a dedicated offline device (as much as you'd be comfortable hiding under your mattress).
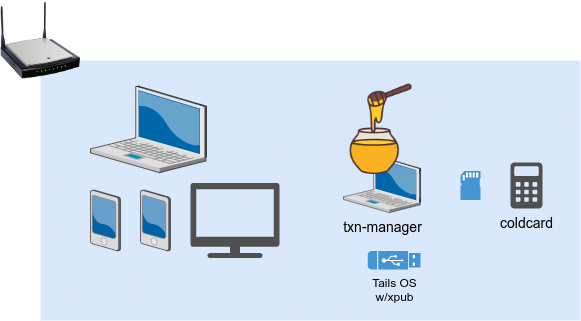
In order to save large amounts of money, and do so securely, you'll want to setup a dedicated signing device. Essentially, this will separate the private keys from the public keys.
Public keys will be managed in a transaction manager (used to verify addresses for receiving Bitcoin, checking balances, and created unsigned transactions). Private keys will be managed in an offline signing device (used only for spending Bitcoin).
While there are many alternatives-- we will use coldcard as an example, but any offline signing device can be used.
no paid nor influenced content -- all views are from personal experience
Transaction Manager
A transaction manager can be any device, although it's recommended to use a dedicated laptop that you can install a Linux flavor such as Ubuntu. However, it is recommended to use Tails OS on a USB drive for the added privacy and security.
Honeypot
Your real transaction manager should be via Tails OS with a persistent xPub (see below). However, you may want to install Sparrow or Electrum with a hot wallet and use that for testing. This can also serve as a honeypot, that is, a Bitcoin wallet decoy. If someone comes looking for Bitcoin, a honeypot can act as an effective decoy.
Tails OS (xPub only)
Similar to level-2, we will use a bootable Tails OS USB drive for the actual transaction manager. To set up your transaction manager with a watch-only wallet, follow the steps outlined in the Coldcard documentation to export your xPub from the Coldcard.
Tails OS with xPub
- On your Tails OS, open Electrum.
- Create a new wallet, select
Standard wallet, and thenUse a master key. - Paste or scan the QR code of the xPub obtained from your Coldcard.
- When you open this wallet, you'll see a warning indicating it is watch-only.
- When you attempt to send from this wallet, it will create an unsigned transaction file, which will need to be signed by the signing device (see below).
Signing Device
Adapted from the Coldcard docs
Sign Transaction
- Connect your Coldcard to power and enter your PIN if you haven't already done so.
- Select
Ready to Signfrom the main menu. - Insert the microSD card containing the unsigned transaction file from your transaction manager.
- The Coldcard briefly shows Reading... and Validating... before displaying transaction details. Take every opportunity to check and double-check transaction information. Ensure the address you are sending funds to is absolutely correct.
- If the transaction information is correct and the fee acceptable, press OK (✓). Otherwise, abort the transaction by pressing X.
- Your Coldcard signs the transaction and saves two files to the microSD card: one ending in
-signed.psbtand another-final.txn. - Press OK (✓) to return to the Main Menu.
You can now power off the Coldcard and transfer the microSD card back to the transaction manager running Tails OS.
Broadcasting (signed) Transaction
- Insert the microSD card with the signed transaction files.
- Open Electrum or Sparrow and load the
-signed.psbtor-final.txnfile. - Verify the transaction details again, ensuring the destination address and amount are correct.
- Broadcast the transaction to the Bitcoin network.
- Once broadcasted, you can safely remove the microSD card and store it securely.
Alternative Signing Devices
While Coldcard is a robust, Bitcoin-only, air-gapped solution, other dedicated hardware options exist for self-custody. Here are some recommended alternatives:
- SeedSigner: A DIY, open-source signing device built on affordable hardware (Raspberry Pi Zero). SeedSigner is air-gapped, supports QR code scanning for transaction signing, and is ideal for those who prefer a fully verifiable solution.
- DIY Raspberry Pi Zero: For advanced users, you can create your own signing device using a Raspberry Pi Zero with open-source software.
- Specter-DIY: This approach requires technical expertise but offers complete control over the hardware and software stack.
These alternatives prioritize open-source principles and Bitcoin-only functionality, aligning with the ethos of self-custody. However, they may require more setup effort compared to a Coldcard.
Hardware Wallets: Considerations
Hardware wallets can be an excellent self-custody solution, but not all are created equal. Devices like the Coldcard and SeedSigner are Bitcoin-only, air-gapped, and prioritize open-source software, allowing users to verify entropy and maintain full control over their keys. Other hardware wallets may:
- Support multiple cryptocurrencies, increasing complexity and attack surfaces.
- Rely on proprietary software or hardware, limiting transparency.
- Require online connections, reducing security compared to air-gapped solutions.
When choosing a hardware wallet, prioritize devices that are Bitcoin-focused, air-gapped, and open-source to ensure maximum security and sovereignty.